In this blog, we will show you how to set up Shopify MetaObjects using JSON. Shopify MetaObjects are a powerful construct that allows you to store additional structured information and then display it on your store.
Setting up Shopify MetaObjects using JSON can be a complex task. We hope that we can explain the process clearly and show you how you can easily set up Shopify MetaObjects using JSON in 30 minutes. If you are interested in the developer API for Shopify MetaObjects, we highly recommend checking out Shopify’s official documentation here.
Problem Statement
Recently, while working on a Shopify Plus client site, we had a requirement to display different size guides (e.g., youth, adult) in tabular form under the product details section. Additionally, there were requirements to handle multiple categories (e.g., t-shirt, merchandise, caps, etc.). After reviewing the requirements, it became evident that Shopify MetaObjects would be the right fit to handle such a complex use case.
Pre-requisite
A Shopify store needs to be in existence in order to perform the below operations.
SETUP SHOPIFY METAOBJECTS USING JSON
Let’s start the timer 🙂
Building a MetaObject
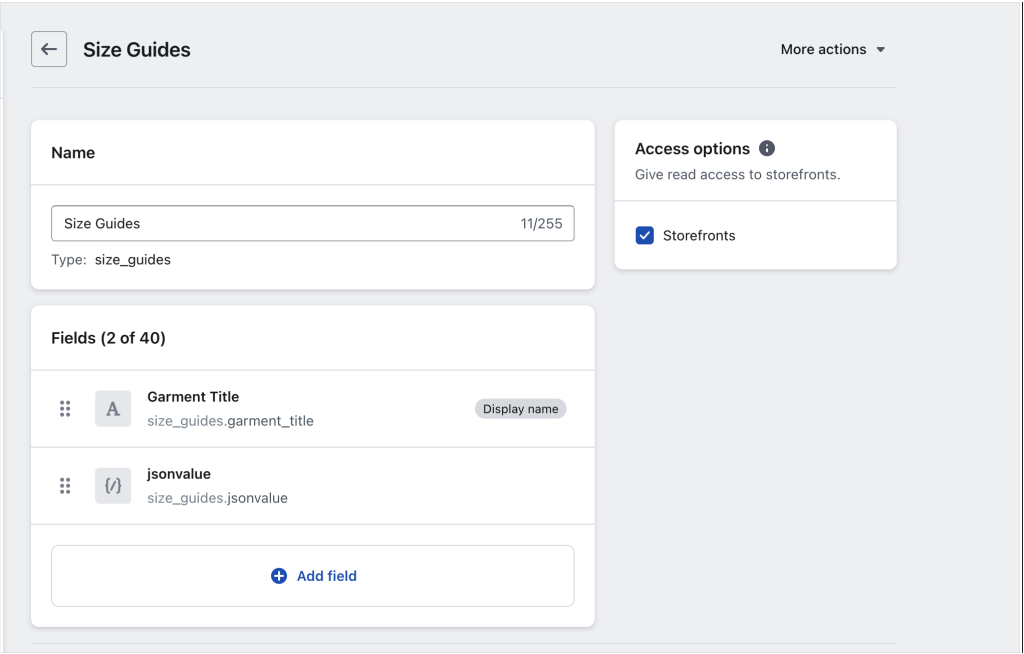
Step-1: Create a MetaObject named “Size Guides” in the Shopify admin section under Settings > Custom data > MetaObjects. We will next add two fields to the MetaObject.
- Field1: Add a Text Field to the MetaObject e.g. Garment Title
- Field2: Add a JSON field to the MetaObject e.g. jsonvalue with the following JSON Schema:
{“$schema”:”http://json-schema.org/draft-07/schema#”,”type”:”array”,”items”:{“type”:”object”,”additionalProperties”:{“type”:”string”}}}
Screenshot:
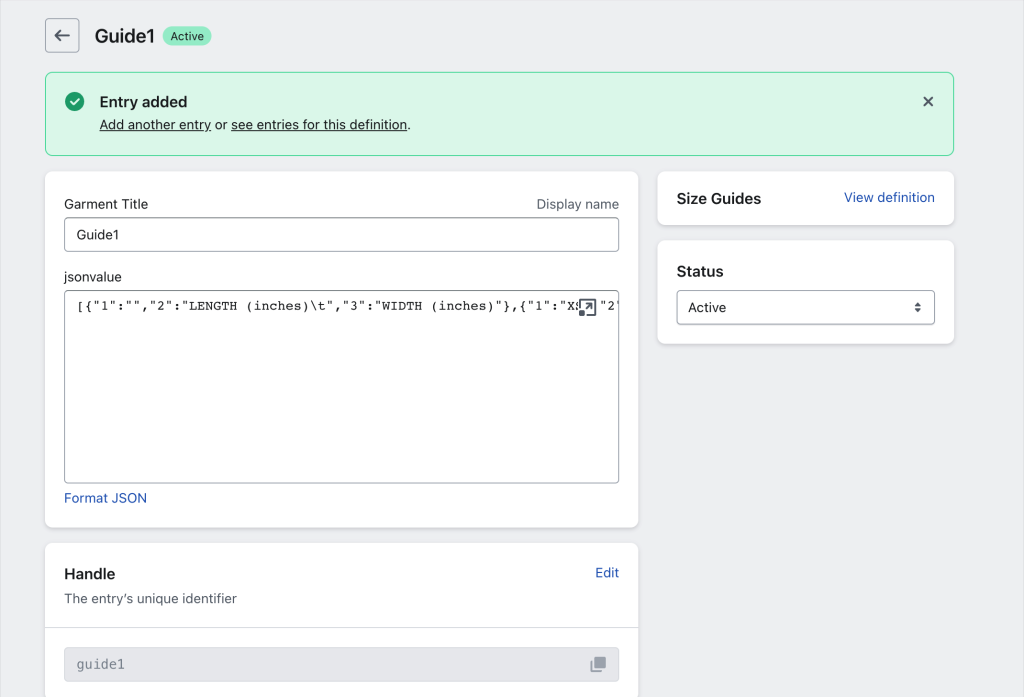
CREATE AN ENTRY
Step-2: To add an entry to the MetaObject, click on the MetaObject, and then select ‘More entries > Add new entry.’ The entry text should match the JSON schema and can have any identifiable title. For our size guides MetaObject, we used the following text as an example:
[{“1″:””,”2″:”LENGTH (inches)\t”,”3″:”WIDTH (inches)”},{“1″:”XS”,”2″:”27-1/2″,”3″:”20-1/2″},{“1″:”S”,”2″:”28-1/2″,”3″:”21″},{“1″:”M”,”2″:”28-1/2″,”3″:”23″},{“1″:”L”,”2″:”29-1/2″,”3″:”24-1/2″},{“1″:”XL”,”2″:”30-1/2″,”3″:”26-1/2″},{“1″:”2XL”,”2″:”31-1/2″,”3″:”27-1/2″},{“1″:”3XL”,”2″:”32-1/2″,”3″:”28-1/2″}]
Screenshot:
REFERENCING METAOBJECTS
There are two ways you can display metaobject data on your online store.
First, you can connect metaobjects to your theme by adding sections with blocks that support dynamic sources, as explained in Shopify’s documentation here. In such cases, there is no need to create a Metafield, as shown in the next step.
Second, you can create a Metafield that references the MetaObject and then assign a Metafield value to each product. We chose this approach because it gave us more control over how we wanted to fetch and display data on the client store.
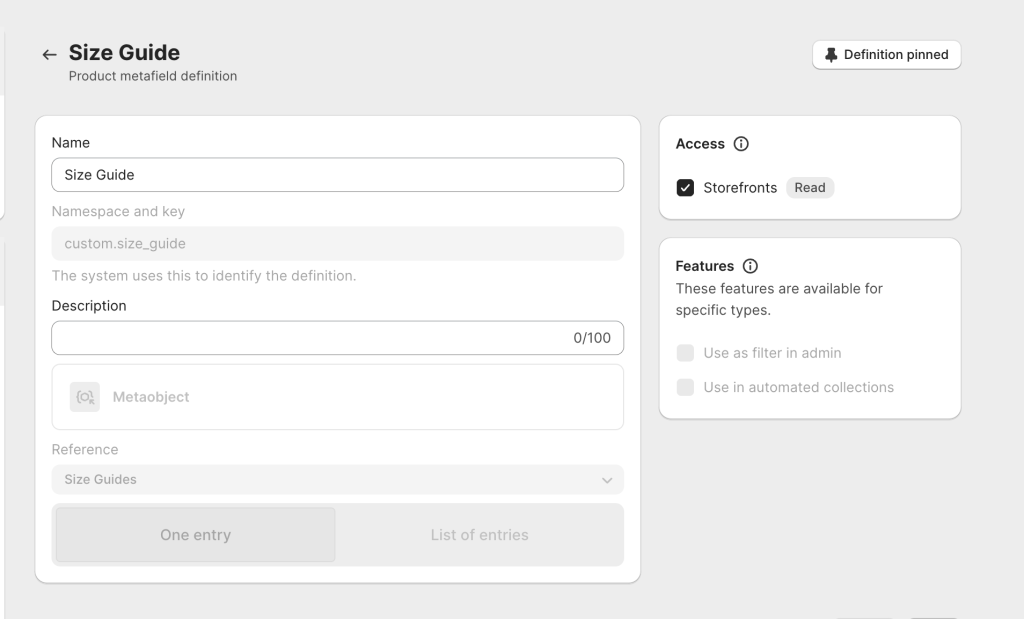
CREATE A SHOPIFY METAFIELD REFERENCING THE METAOBJECT
Step-3: Create a Metafield (e.g., size_guide) in the Shopify admin section under “Settings > Custom data > Metafields > Product > Add Definition” section.
Then, click “Select type” and choose “MetaObjects” with a reference to “Size Guides,” as shown below.
Screenshot:
Create PRODUCTS WITH METAFIELD
Step-4: Create some products and select the ‘Guide1’ entry for the Metafield that was created in step 2.
DISPLAY METAOBJECTS DATA ON YOUR onLINE STORE
Step-5: To display MetaObjects data on our online store, edit the theme (main-product.liquid) with this code.
{% assign product_metafield = product.metafields.custom.size_guide.value %}
{%- if product_metafield -%}
{% assign servvai_metaobjects = shop.metaobjects.size_guides.values %}
{% assign servvai_name = product_metafield.garment_title %}
{% for servvai_metaobject in servvai_metaobjects %}
{% assign servvai = servvai_metaobject.jsonvalue.value %}
{% assign servvai_metaobject_name = servvai_metaobject.garment_title.value %}
{{ servvai }}
{% endfor %}
</div>
{%- endif -%}
Further customizations can be made to the theme based on your store’s requirements. We added some additional customizations to display this in an accordion style under the product details for our client.
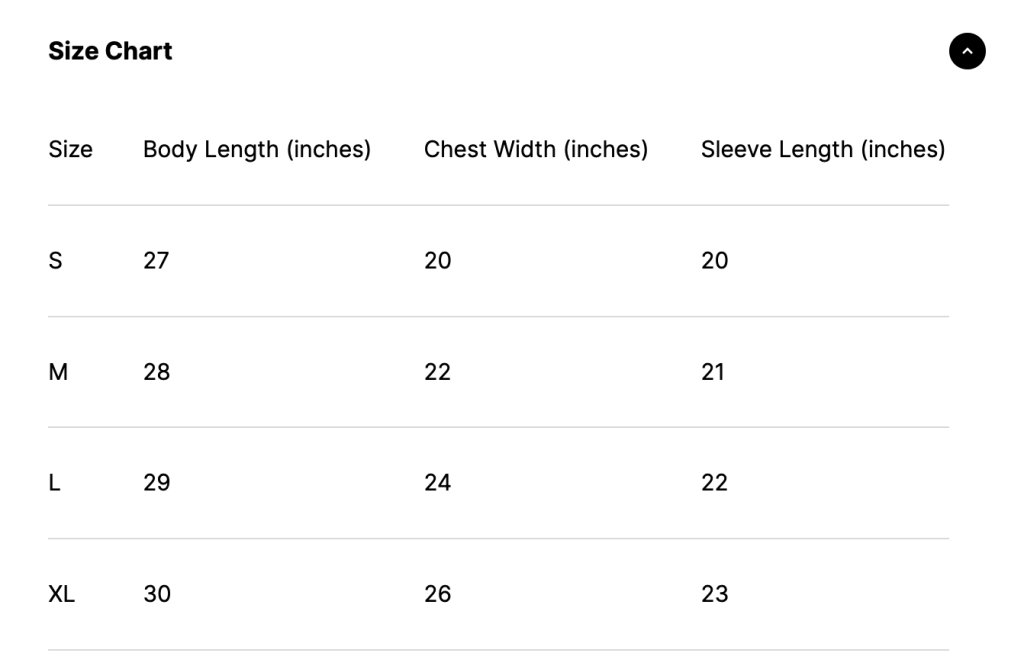
RESULT
If everything goes as planned, you should now be able to browse the product and see the Size Chart, i.e.
We hope this will save some of your precious time and help you set up Shopify MetaObjects using JSON. If you liked the blog, please post a comment below and let us know. Also, check out more Shopify and other web development-related blogs on our site here
At CodeRise Technologies, we work with a lot of Shopify Plus and other medium to large-scale stores. We have even developed a Shopify app called Servv.ai, which is one of the best hybrid Events and Appointment Bookings apps for Shopify.
If you own a Shopify Store and need help with theme customizations or custom app development, please contact us today.