ETCD on Kubernetes with High Availability
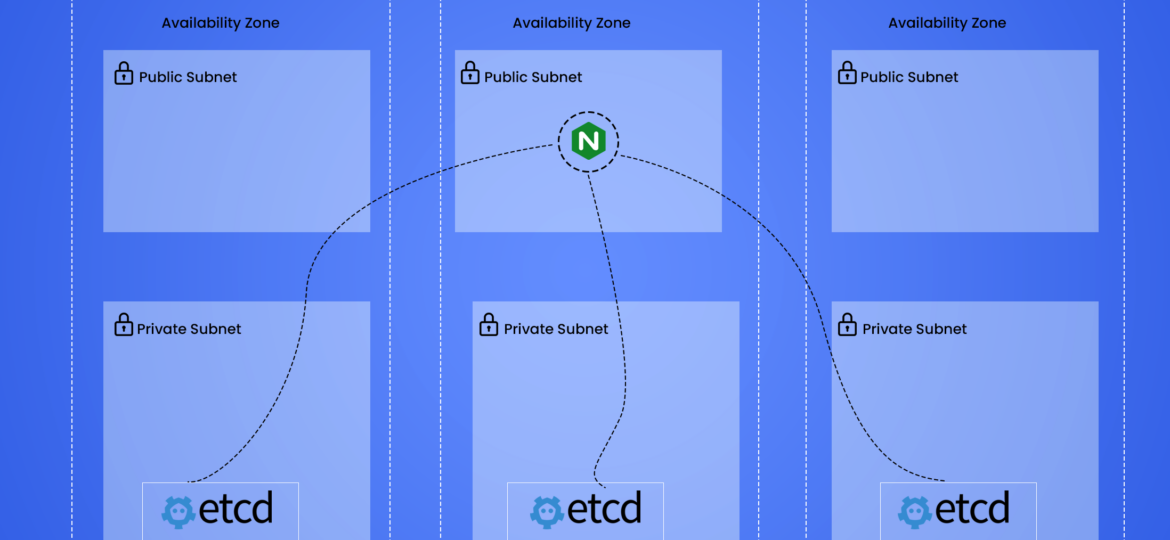
In this blog, we will cover how to maintain an Etcd on Kubernetes with High Availability. We will be installing Etcd v3.5.4 on Amazon Elastic Kubernetes Service (EKS), but a similar setup should work for other Kubernetes clusters as well.
Prerequisites
- Kubernetes 1.19+
- Helm 3.2.0+
- Clone and create a feature branch in `etcd` repository. Update the etcd cluster using helm to v3.5.4 from here – https://github.com/bitnami/charts/tree/master/bitnami/etcd
1. Maintain Etcd cluster
Etcd can be set to automatically compact the keyspace with the –auto-compaction-* option with a period of hours. Enable Automatic Compaction mode in value.yaml file to run every hour (by default value is 0 which means it is disabled)
autoCompactionMode: "periodic"
## @param autoCompactionRetention Auto compaction retention for mvcc key value store in hour, by default 0, means disabled
##
autoCompactionRetention: "1"
2. Defragmentation using cronjob
After compacting the keyspace, the backend database may exhibit internal fragmentation. Any internal fragmentation is space that is free to use by the backend but still consumes storage space. Compacting old revisions internally fragments etcd by leaving gaps in backend database. Fragmented space is available for use by etcd but unavailable to the host filesystem. In other words, deleting application data does not reclaim the space on disk. Customized cronjob to automate Defragmentation. Replace the password before deploying.
{{- if .Values.defrag.enabled -}}
apiVersion: batch/v1beta1
kind: CronJob
metadata:
  name: etcd-defrag-cronjob
  namespace: etcd
spec:
  schedule: {{ .Values.defrag.cronjob.schedule | quote }}
  successfulJobsHistoryLimit: {{ .Values.defrag.cronjob.historyLimit }}
  jobTemplate:
    spec:
      template:
        spec:
          containers:
          - name: etcd
            image: bitnami/etcd:3.5.4-debian-10-r25
            args:
            - /bin/sh
            - -c
            - etcdctl='etcdctl';
              export ETCDCTL_API=3;
              for i in 0 1 2;
              do
                etcdctl --user root: --endpoints="http://etcd-$i.etcd-headless.etcd.svc.cluster.local:2379" defrag -- cluster;
                etcdctl --endpoints="http://etcd-$i.etcd-headless.etcd.svc.cluster.local:2379" --write-out=table endpoint status;
                etcdctl --endpoints="http://etcd-$i.etcd-headless.etcd.svc.cluster.local:2379" alarm disarm;
                etcdctl --endpoints="http://etcd-$i.etcd-headless.etcd.svc.cluster.local:2379" alarm list;
              done;
              sleep 200
          restartPolicy: OnFailure
{{- end }}
Customized values.yaml for defrag cronjob.
Recommended defragmentation is every 24 hours i.e.
defrag:
  ## @param defrag.enabled Enable auto defrag by periodically
  ##
  enabled: true
  cronjob:
    ## @param defrag.cronjob.schedule Schedule in Cron format to defragmentation
    ##
    schedule: "0 0 * * *"
    ## @param defrag.cronjob.historyLimit Number of successful finished jobs to retain
    ##
    historyLimit: 1
3. Load testing
The following script was used to insert dummy key-value pairs for load testing:
for ((i=0; i<10000000; i++)); do etcdctl --user root: put foo$i bar; done
2 Million requests were inserted with the above-mentioned command. We can increase the key size or request the Performance Testing team to perform load tests using JMeter. A longer key will increase the DB size very quickly.
Checkout more of our blogs here


